Background

Tuesday, June 30, 2015

Tuesday Tidbit & Last Chance for June Specials

   Happy Tuesday to you all! I hope you're having a great day and enjoying the start to your week! Can you believe it's the last day of June?? I sure can't! I only have a month left of this pregnancy and I can hardly believe it! It's gone way too fast!

   I also can't believe that the 4th of July is this weekend! My house is still slightly under construction and in disarray for the next couple weeks, but I had to get out some festive decorations for my kitchen. Just to add a little pizazz amongst the chaos! 

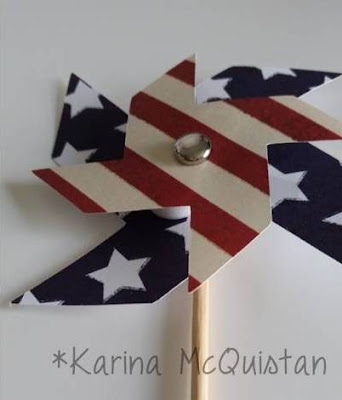
   Today I want to share with you a quick and easy way to make festive 4th of July decorations this week as a last minute touch for your table arrangements, BBQ decorations, or even just because! I made these table decorations 2 years ago when I had family in town for the 4th! Since then, I have stored them away with my table linens, and get them out every year around this time to jazz up my table once again!


   Here's what you need to make this quick and easy project:

1.) Wooden Skewers
2.) Festive 4th of July paper or stamped paper
3.) Silver or White brads
4.) Washi tape or Liquid Glass
5.)  Foam tape
6.) Artiste Cricut Cartridge

   First, you cut the Accent 1 image from pg 50 of the Artiste handbook at 2 3/4" tall (height). You can cut multiple of these at one time if you are doing one for each place setting. Then cut the same image on pg 50 at 2" tall (height) from your second piece of paper or stamped background. The papers I used were old ones from my stash that I dug out!


   Next, place a brad through the center of the smaller pinwheel (the 2" one). Then add foam tape to the back of it. Adhere this pinwheel to the front of the larger pinwheel.


   Lastly, attach your pinwheels to a wooden skewer. I used thin washi tape to tape my pinwheels to the skewer. However, you could use a dab of Liquid Glass to help hold the skewer in place as well!


   I hope you enjoyed this quick Tuesday Tidbit today! If you have any questions, though, please do not hesitate to shoot me a message or comment! I would love to help you get your holidays decor ready for the weekend!

   Also, don't forget it's the last day of June which means it's the last day to take advantage of all the steals and deals June has to offer! Including the amazing My Crush promotion that gets you a FREE stamp set!


   You can see all the monthly promos under my steals and deals tab at the top of this page, and you can shop my online shop for these specials until midnight tonight! Have a great rest of your week, and until next time:

Here's to life, love, and creativity!


Sunday, June 28, 2015

Artwork Spotlight: Blossom Layout #3

   It's the last weekend of June and I have one more Blossom layout to share with you today! Today's layout is a one-page spread that was also a promotional kit for anyone that hosted a CTMH party with me last month! The hosts received this kit and all the pre-cut supplies needed to put this fun layout together when I gave them their hostess gift bags!


   I used a sketch from "Scrapbook Generations: One-page Sketches" book Volume 2. I love these inspirational sketches! They always get my creative juices flowing so much faster when I start creating (especially if I haven't created in awhile).

   For this page I used Kraft cardstock as my base. Then I cut a piece of Blossom paper for the main strips in the background. I even used the super cute, striped zip-strip from the top of my paper! I used my Cricut Explore to weld and cut the notebook edge border from the Artbooking cartridge out of Sweet Leaf cardstock. I also cut a piece of Sunset cardstock as the other background strip.

   I edge distressed my larger background strips for added texture, and then used up more of my Blossom complements to embellish the rest of the page. The word flags come from the Carnival and Boardwalk washi tape sets, but I backed them with White Daisy cardstock to make them pop a little more off the page.

   I also tried a fancy stamping technique for this page. I did a type of reverse shadow stamping to make my images pop against the Kraft background. The title came from the "Documenting Moments" stamp set out of the Seasonal Expressions II Idea Book.

   I stamped it in Lagoon pigment ink first, and set it aside to dry. Then I stamped over top of the image with White Daisy pigment ink. I off-set this second stamp to allow the Lagoon to "peek" out as a shadow, and I love how it turned out! It's so easy to do techniques like this with clear, acrylic stamps!


   I used the same reverse shadow technique with the arrow stamp in the bottom left corner. This image is from the "One-Way Borders" stamp set in the Annual Inspirations Idea Book. I stamped one direction in Sweet Leaf pigment ink, and the other direction in Sunset pigment ink. I let those dry, and went back over them with White Daisy pigment ink. I love how the color shows through, and the images stand alone!

   Many of the products that I used to complete this layout are retiring at the end of the summer! You do not want to miss out on your favorite paper collections, stamps, and embellishments! So make sure and shop the retiring products selection on my Online Shopping site! Many items are going fast, and are not guaranteed to be in stock through August! Shop early and shop fast to get the items you want! 

   It's also the final days to order the Blossom pack, or the Blossom WOTG, with the Blossom Complements from me this month! When you do you will automatically receive instructions to complete the exclusive layout you see below for FREE!! What are you waiting for?? Get your free layout instructions today and place your order!


   Have a great start to your week, everyone, and I can't wait to share more projects with you in July when I'll be featuring the Brushed paper collection! Until next time:

Here's to life, love, and creativity!

Thursday, June 25, 2015

Artfully Sent Cards

   Hey everyone! I have some more artwork to share with you today! I am hoping that I can make more time to get creative this last month of pregnancy, and maybe even start our little bundle's scrapbook to get ahead! We'll see, though! We still have a lot to do to prepare for our little man's arrival!

   Today I am sharing some cards that I made last month using the Artfully Sent Cricut cartridge. I have had a lot of fun playing with this cartridge lately, and I have also had a lot of greeting cards that needed to be sent out the last couple months! So here are a couple of the cards that I made and sent:

This one you might have seen already on my blog and/or other social media! I made this card using Blossom papers, matching cardstock, and the "Variety of Thanks" hostess stamp set from the Seasonal Expressions I idea book.
I made this Mother's Day card for my Grandma and mother-in-law last month. It was very quick and easy to put together, and I loved that I could make a matching envelope liner as well! The papers I used were scrap papers from my stash!
I recently purchased a paper pack from Michaels that had watercolor, ombre-style pattern papers in it! I love the possibility of this paper pack and knew I had to use it with some of the gorgeous cards from Artfully Sent! This card is a pocket-style card that I cut from black shimmer paper. I then backed the image with the ombre paper, and tucked a journaling card in the pocket to act as my "letter". The size was perfect for 4x6 photos, so I included recent photos of my nephew in the pocket, too, before sending it to my sister for Mother's Day.
Here's another version of the same card with different colors behind it! I sent this card with recent pictures of my niece to my other sister for Mother's Day. I used the left over scraps from the paper to make the envelope liner, and my ShinHan markers to color the sparkles to match the card!
I made 3 versions of this card since I had so many anniversaries to acknowledge last month. I used up scrap papers from my stash, and scraplifted the design from CTMH corporate.  I love the simple elegance of this card, and the fun combination of pattern papers that I used!
This card was quick and easy to make, but also the perfect card to send to my nephew for his birthday! I used a "Boyhood" paper pack that I have from DCWV to back the letters I then added black star stickers to the front to give it just a little added interest.
This is the inside of the card to my nephew. He really like pirates, so I had to include this fun paper in his card and as the envelope liner. The sentiment came from a Hero Arts stamp set I have in my stash!

   I hope you all enjoyed viewing these fun greeting cards! These were super fast and easy to put together, too! I made 8 cards in one sitting in less than a couple hours! It was also a great way to use up my scrap papers, and break out some new supplies! Plus the Artfully Sent cartridge makes it super easy to come up with stylish and trendy cards in just minutes!

   Have a great rest of your week, and if you have any questions on these projects or need to order you own Artfully Sent cartridge, please let me know! I would love to help you out! Until next time:

Here's to life, love, and creativity!

Tuesday, June 23, 2015

Tuesday Tidbit: Technique Overhaul

   Welcome to another Tuesday Tidbit this month! Today I wanted to point out an awesome resource for stamping and crafting techniques. Are you ready for it?? It's super easy to access, and I promise you're going to love all the inspiration! It's CTMH's corporate Instagram account! Have you been following along this month?

   The last couple weeks CTMH corporate has been sharing different techniques on their Instagram account for stamping, distressing, inking, and so much more! There have been some old and new techniques (new to me at least), and I always love seeing comparisons of techniques on the same page.

Different types of coloring techniques: 1.) ShinHan Alcohol markers 2.) Paper piecing by stamping the image on several pattern papers and fussy cutting them out 3.) Watercolor pencils and water brush 4.) Blending Pens and ink pads

Sanding Kit techniques: 1.) Dry Embossing using the scoreboard and sand to expose the white core 2.) Circular sanding with sanding block 3.) Embossing Folder used and sanded to expose the white core 4.) Sanded Edges using the file

Inking techniques: 1.) Swipe stamping at a diagonal 2.) Spritz stamping by inking your stamp and spritzing it with water 3.) Watercolor blending done by putting ink colors on the All-Purpose mat, spritzing with water, applying the ink to your stamp, and stamping 4.) Ghost stamping done by stamping image in White Daisy ink on dark cardstock then re-stamping with a color slightly off-set from the original

   These are just a couple images that were shared last week. Make sure and get on Instagram and start following CTMH at @ctmhofficial to see all the fun techniques they have been sharing. Enjoy the rest of your week, and happy crafting! Until next time:

Here's to life, love, and creativity!
  

Sunday, June 21, 2015

Artwork Spotlight: Blossom Layout

   Welcome to another artwork post for June! It's Sunday and I have another Blossom layout to share with you all today! 

   This month I am featuring the Blossom paper pack in my projects, workshops, and classes. So today I want to share with you a layout that I created using the Blossom paper pack, Blossom Complements, Carnival Washi tape, and the Adventure Fundamentals paper pack. 


   I used a sketch from the "Make It From Your Heart Vol 2" Pattern 5 to come up with this layout, and I just love it! Once I decide what pictures to use on this layout I will add a title above the photo on the left side, and journaling in the blue box on the right side. The faux stitching around the edges was made using a gray alcohol marker, and the circle embellishments are cork circles from the Pathfinding assortment.

   This picture doesn't do the colors justice, but I mounted some of the photos on slate cardstock, and the photo on the left is also mounted on Honey chevron fundamentals paper! 

   Don't forget, when you purchase the Blossom pack, or the Blossom WOTG, with the Blossom Complements from me this month, you will automatically receive instructions to complete the exclusive layout you see below for FREE!! What are you waiting for?? Get your free layout instructions today and place your order!


   I hope you're having a great weekend and enjoyed seeing another Blossom layout this week! Until next time:

Here's to life, love, and creativity!

Friday, June 19, 2015

CTMH Updates!!

   Happy Friday, everyone! Today I head down in Wisconsin for my cousin's graduation party and for my baby shower this weekend. I am looking forward to celebrating our little guy yet again this month with family and friends! I think he's definitely loved already!

   Before I go, though, I have some updates to share with you from CTMH! I have a lot to share, so without further delay...here ya go:

Updated "While Supplies Last":


   Yesterday, CTMH updated their clearance items on my Online Shopping site! There are a lot of new and exciting items discounted to sell, and believe me you don't want to miss out on some of these goodies!

Here's just a few of the new items added to the "While Supplies Last" section on my Online Shopping site!

August's New Product Release:  


   Another exciting announcement I have for you today is the unveiling of August's stamp-of-the-month! The current Annual Inspirations and Seasonal Expressions II Idea Books have been extended to stay live until September 1st! However, the Annual book does not have an August SOTM to show you! Well CTMH released the August SOTM for everyone to see so that we can plan our orders ahead of time for this special $5 stamp set!

   The August SOTM is called "Framed" and it has 12 awesome images to use on all your projects and designs. Here's a picture of the August SOTM:


   Isn't this awesome?? I love how versatile it is and all the fun fonts it has! I can't wait to start creating with this awesome stamp set, and I think you're going to love it, too!

   In August, CTMH will also be releasing a new paper pack as well! I have no idea what it looks like or what colors it has, but I am excited that CTMH is accommodating the extended amount of time the Idea Books are live with extra product releases! I will make sure and keep you updated on the new paper pack in July as soon as images are released to us!

Unavailable Items:


   Have you checked out the list of retiring products yet? There's so many great things to scoop up from this list, but I have to tell you that some of it is already gone! Here are the products that are no longer available and have sold out:


Z1296    Distressing Inks                
Z1342    Dark Chocolate Faux Leather Album       
Z1473    White Daisy Die-Cut Cards          
Z1823    My Creations Clear Treat Tubes                
Z1942    Picture My Life Avonlea               
Z2002    Topiary Washi Tape        
Z2042    My Crush In the Pink Assortment                            
Z4131    Exclusive Inks Organizer               
Z4132    Exclusive Inks Stamp Pad Tower
  
   There is still time to take advantage of the My Crush promotion going on this month. The "In the Pink" book is still available even though the "In the Pink" assortment has sold out. CTMH announced that when you purchase the "In the Pink" book and matching clips then you get the coordinating stamp set, "Glitter Glam", for FREE!! So there's still an opportunity to get this Crush book for yourself and score an awesome deal!


   That's it, everyone! Those are the updates I have for you before the weekend! If you have any questions or need anything, though, feel free to contact me! I would love to help you out! I hope you all have a great weekend, and until next time:

Here's to life, love, and creativity!

Thursday, June 18, 2015

Artwork Spotlight: Blossom Layout

   Sorry I haven't had a chance to post Artwork these last couple weeks! I have had back -to-back baby showers the last couple weekends, and my weekend posts got put off because of this! I hope everyone is having a great start to their week, though! Enjoy this first artwork post for June!  

   Hey, everyone! It's the first artwork post for June which means that I have a Blossom paper project to share with you today!

   This month I am featuring the Blossom paper pack in my projects, workshops, and classes. So today I want to share with you a layout that I created using the Blossom paper pack, Blossom Complements, Flaxen thick twine, the Artbooking Cricut cartridge, and the "Documenting Moments" and "Snapshot Memories" stamp sets!


   I used the sketch from the "Make It From Your Heart Vol 2" how-to book (page 15). I wanted a little more masculine feel to the layout, so I used the greens and blues from the Blossom paper pack. I then paired it with Kraft and Honey cardstocks.

   For embellishments, I stamped the washi tape images from the "Snapshot Memories" stamp set in Lagoon (sorry I just realized one of my washi strips is falling off on the right side...oops). Then I used Honey triangle washi tape, and retired wooden shapes as well! The title I cut out twice from the Sunset pattern paper in the pack. I then layered them for a shadow effect. The flags and arrow border are from the Blossom Complements set!


   I loved how this layout turned out! I can't wait to put some fun pictures on here to complete the look! If you have any questions on products used, please let me know! Otherwise you can shop for everything you need to complete this project on my Online Shop!

  Also, when you purchase the Blossom pack, or the Blossom WOTG, with the Blossom Complements from me this month, you will automatically receive instructions to complete the exclusive layout you see below for FREE!! What are you waiting for?? Get your free layout instructions today and place your order!


   Until next time:

Here's to life, love, and creativity!

Tuesday, June 9, 2015

Tuesday Tidbit: Many Ways to Distress

   Welcome to the first Tuesday Tidbit for June! Today I thought I would share a video from CTMH about the different tools and techniques you can use to distress your paper projects! I know that this might be a "review" tip for a lot of you, but I like to revisit classic techniques now and then because it's good to be reminded of the simple things we can do to spruce up our everyday projects!

   I love the look of distressed paper, but there are a lot of ways to achieve this look. You can use ink, sandpaper, or a sharp edge! It all depends on the style or look that you are going for! Check out the awesome video demonstrating some of my favorite ways to distress paper projects:


   Heads up, though, CTMH is retiring the Distress Inks this year! So if you are interested in scoring this set of inks (in Black and Chocolate, 1"x1" pads for only $3.95/set), make sure and shop my Online Site today because these amazing inks will sell out fast!

   I hope this has inspired you to get crafty this week! Until next time:

Here's to life, love, and creativity!

Friday, June 5, 2015

2015 Retiring List!!!!

   CTMH released the retiring products list for 2015 yesterday! Holy cats, friends! There are sooooo many amazing products on this list! I am sad to see some of them go, but I'm even more excited to see what could be replacing them in the new Annual book (coming in September)!!!

   All the items on the list are now considered while supplies last! That means that if you see some of your favorites, or items that you still want to get from your wish list, NOW is the time to get them! I will not be able to get any retired items for you (easily) once they're gone! So start shopping, friends, and let me know if I can help you plan your orders through the summer!

Here is a small picture of some of the items retiring this year! I couldn't make my screen font small enough to get a screenshot of all the items! So there's definitely a lot of great goodies to still scoop up while you can!

   I hope you're having a great weekend! Stop by my Online Shopping site to view all the retired items, clearance items, and all available stamp sets from CTMH! Trust me; you don't want to miss out on your favorites! Until next time:

Here's to life, love, and creativity!

Thursday, June 4, 2015

Window Frame Project

   I am officially 31 weeks pregnant today! I can't believe how fast this pregnancy is going! I feel great and have no complaints. I feel very blessed so far, and hope it lasts through labor as well!

   Today I have a very special project I want to share with all of you! Back in April I had a lady I met at last fall's craft fair contact me. She was wondering if I could help her with a graduation project that she wanted to complete for her daughter's party in June. We had talked about it briefly at the craft fair last fall, and she was following up in hopes that I could be hired to design this project for her!

   I was flattered! I love doing projects for people, and this one was right up my alley! She had 2 windows with 9 panes in each. She was hoping that I could design a project so that she could showcase her daughter's photos from birth to 11th grade in each pane! She wanted a shabby chic type of feel, and she wanted to use a coral color and tiffany blue color as the many accents. She also had these burlap 8x10 boards that she was hoping to use on the back of each pane for each picture to sit on.

   So I met with her at the end of April before we left for New Orleans, and then started working on the windows a week after we got back! I finished up the final details Memorial Day weekend, and her other daughter picked them up from me last week!

   It was a little challenging trying to figure out the best way to attach the burlap boards without showing a lot of glue or adhesive from the front side, but I think I got it figured out after trying a couple things! 

   I am really pleased with how they turned out, and I wanted to share pictures* of them with all of you so you can see some of the stuff I have been working on lately!  I'm sorry if the pictures are a little blurry. It is hard to get a good picture against glass!

First Window Pane Completed
Close-up of the Name Banner I put in the upper corner of the frame. These were chipboard letters that I painted in white acrylic paint and then coated with Avery Elle Sea Glass pigment ink. To make sure the ink didn't rub off, I then coated each letter in a Matte finish Mod Podge.
Here is the first row of pictures. I used My Mind's Eye, Heidi Swapp, and Core-dinations papers for the whole project. I cut the branches and paper flowers on the Cricut using the Art Philosophy and Artiste cartridges. I then embellished the photos with brads, pearl gems, mini clothespins, Base & Bling charms, lace ribbon, and a border punch. 
Here is the second row of pictures. I tried to keep the theme similar throughout both windows, but accented and laid each pane out different for contrast! These pictures were embellished with more of the same die-cuts, pearl gems, paper doilies, hemp twine, Base & Bling charms, and some hand-stitching over vellum!
Here is the third and final row on the first window. I embellished these pictures with paper butterflies, paper flowers, pearl flourishes, lace ribbon, and a stick pin.
Here's the 2nd window completed!
Here's the burlap banner on the second window.
Here's the first row of the window at a closer view. I embellished these with similar items as the first window frame! I have pearl gems, a die-cut doily, hand-stitching, Base & Bling charms, hemp cord, and the same papers from the same lines as before!
Here is the second row of pictures. You can see that I embellished the panes very similarly between the two windows. It made it easier to tie everything together!
Here is the last row of pictures! I love the feminine feel of the whole project, and the vintage look with everything put together.
Here's a close up picture of the paper flower detail that I put on both bottom corners of the windows. I cut the rolled flowers from CTMH's Art Philosophy and Artiste cartridges, distressed the edges in Cashmere ink, rolled them using my quilling tool, and glued them together with Liquid gold (I mean glass)! Then I added some distressed branches, and some pearl finishes, and that was it! These were super fun to make!
The "titles" under each picture were stamped with White Daisy ink on chalkboard paper. Chalkboard paper isn't very porous, though, and the ink takes a long time to dry. So to make it smudge proof I embossed it with clear embossing powder and a heat gun. The two font stamp sets I used to create these titles were the "Glamour Lowercase Alphabet" and the "Artfully Sent Alphabet" both from CTMH!

   I hope you enjoyed looking at my finished project! I had a blast making it, and can't wait to hear how it's received at her graduation party in a couple weeks! If you have any questions on products used or techniques, please let me know! Otherwise, have a great rest of your week, and until next time:

Here's to life, love, and creativity!

*I was given permission by the mom to post these pictures to my social media sites.

Monday, June 1, 2015

June's Steals & Deals

   Summer is right around the corner! June is here, and it's going to be an amazing month! Since today is the first day of the month, I have my monthly newsletter to share with you! Click on the link below to access my newsletter, but make sure and subscribe so you never miss an "issue"!

Candid Correspondence: June Newsletter
   
   I hope this has all of you excited for June! Let me know if you need anything or would like to place an order this month! Have a great start to your week, and until next time:

Here's to life, love, and creativity!