Background

Showing posts with label Pigment ink. Show all posts

Sunday, June 28, 2015

Artwork Spotlight: Blossom Layout #3

   It's the last weekend of June and I have one more Blossom layout to share with you today! Today's layout is a one-page spread that was also a promotional kit for anyone that hosted a CTMH party with me last month! The hosts received this kit and all the pre-cut supplies needed to put this fun layout together when I gave them their hostess gift bags!


   I used a sketch from "Scrapbook Generations: One-page Sketches" book Volume 2. I love these inspirational sketches! They always get my creative juices flowing so much faster when I start creating (especially if I haven't created in awhile).

   For this page I used Kraft cardstock as my base. Then I cut a piece of Blossom paper for the main strips in the background. I even used the super cute, striped zip-strip from the top of my paper! I used my Cricut Explore to weld and cut the notebook edge border from the Artbooking cartridge out of Sweet Leaf cardstock. I also cut a piece of Sunset cardstock as the other background strip.

   I edge distressed my larger background strips for added texture, and then used up more of my Blossom complements to embellish the rest of the page. The word flags come from the Carnival and Boardwalk washi tape sets, but I backed them with White Daisy cardstock to make them pop a little more off the page.

   I also tried a fancy stamping technique for this page. I did a type of reverse shadow stamping to make my images pop against the Kraft background. The title came from the "Documenting Moments" stamp set out of the Seasonal Expressions II Idea Book.

   I stamped it in Lagoon pigment ink first, and set it aside to dry. Then I stamped over top of the image with White Daisy pigment ink. I off-set this second stamp to allow the Lagoon to "peek" out as a shadow, and I love how it turned out! It's so easy to do techniques like this with clear, acrylic stamps!


   I used the same reverse shadow technique with the arrow stamp in the bottom left corner. This image is from the "One-Way Borders" stamp set in the Annual Inspirations Idea Book. I stamped one direction in Sweet Leaf pigment ink, and the other direction in Sunset pigment ink. I let those dry, and went back over them with White Daisy pigment ink. I love how the color shows through, and the images stand alone!

   Many of the products that I used to complete this layout are retiring at the end of the summer! You do not want to miss out on your favorite paper collections, stamps, and embellishments! So make sure and shop the retiring products selection on my Online Shopping site! Many items are going fast, and are not guaranteed to be in stock through August! Shop early and shop fast to get the items you want! 

   It's also the final days to order the Blossom pack, or the Blossom WOTG, with the Blossom Complements from me this month! When you do you will automatically receive instructions to complete the exclusive layout you see below for FREE!! What are you waiting for?? Get your free layout instructions today and place your order!


   Have a great start to your week, everyone, and I can't wait to share more projects with you in July when I'll be featuring the Brushed paper collection! Until next time:

Here's to life, love, and creativity!

Tuesday, September 23, 2014

Tuesday Tidbit: Burlap Bags

    Today is officially the first day of fall! I absolutely LOVE fall! It's my favorite time of year for sure! I love the colors, jeans and sweatshirts, all the fun and cute decorations, the cooler temperatures, the amazing foods (hello cider donuts), and of course football games!


    So I think it's only appropriate that today's Tuesday Tidbit is about some cute Fall decorations using CTMH's amazing burlap bags! Burlap is very big right now, and you can find burlap decor everywhere! Plus it's a very fun and natural look that you can use all season long!

    Did you know that CTMH sells a pack of 3 burlap bags for only $4.95?!!? Exciting, right? Burlap can be expensive, but CTMH sells 3 bags in a pack for less than $2 each! Awesome!!!

   I have used these super cute Burlap bags a couple times to make some personalized party and home decor! Some of you might have even attended my workshop last fall using these fun bags! Here's my example from last year's workshop:


    I cut a fun tag from the Art Philosophy Cricut cartridge, and used the Happy Autumn stamp set to decorate the front of this cute burlap bag! You could use this as a silverware holder at a gathering, potpourri bag around the house, or just as an accent in your fall decor display! These also make really cute and thoughtful gift bags, too!

    CTMH's burlap bags have a tighter knit to them to make it easier to decorate, but I still used a scrap piece of cardstock tucked inside my bag while assembling my project!

    The best adhesive to use when decorating these cute bags is CTMH's Liquid Glass! If you don't have any Liquid Glass yet, you definitely need to add it to your next order! It's the "liquid duct tape" all all adhesives!

   I have some more creative inspiration for you using these awesome bags:

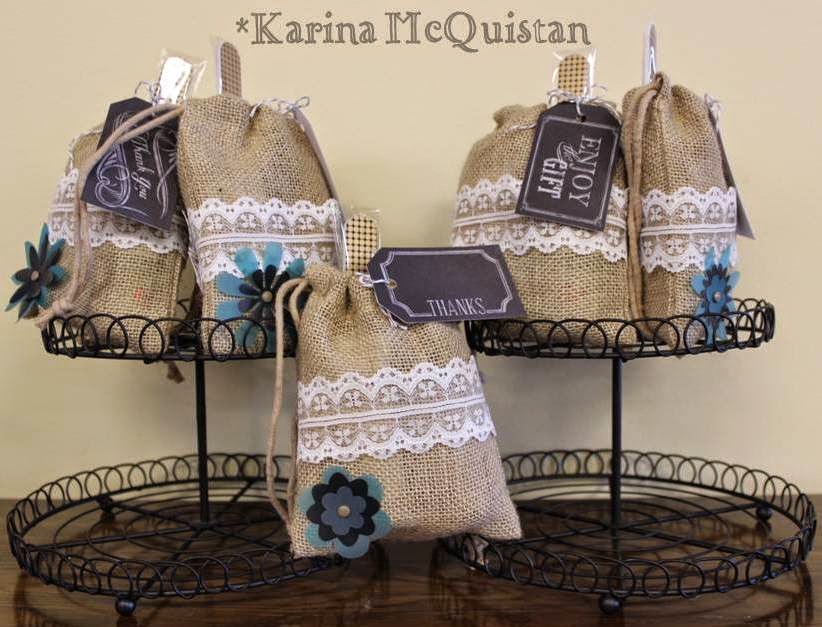
These were prize bags I had at my cousin's Bridal Shower last month! I have to confess, though, that these are not CTMH burlap bags. I had to use larger bags from a store in order to fit all the prize pieces I had for each bag. However, I wanted to show off what all you COULD do with the CTMH burlap bag! I used Liquid Glass to adhere the lace ribbon around the middle, but you can handstitch it on there as well (I hand-threaded the grey Baker's twine to the bag no problem)! I then used a brad to adhere the vellum flowers to the bag on the bottom corner! It was super easy and came together in less than 30 minutes!
You can also stencil, paint, and/or stamp directly on these bags, too! It's super easy, and really adds a personal touch! This project was done by Michelle Snyder (who has an amazing talent and is one of my creative role models)! To get the "true" color to show up, use pigment-based inks or the new ShinHan Touch Twin markers! You'll love this technique! Make sure and have a scrap piece of paper in between the burlap layers, though, because the ink will bleed underneath!
   
    I hope this has inspired all of you to get creative this week and start making some super cute fall decor! If you have any questions about using these cute Burlap bags, let me know! Otherwise, you can order any of the supplies you need on my online shop at your convenience! Have a great Tuesday, everyone, and until next time:
Here's to life, love, and creativity!

Tuesday, September 9, 2014

Tuesday Tidbit: Stencil It

    I have another Tuesday Tidbit to share with you! Today I wanted to share one of my favorite techniques: stenciling! I have been stenciling for as long as I can remember. When I was a kid, I had a book about making your own stencils, and I would sit in our family craft room cutting and designing stencils to use on my projects for 4H! It was so much fun!

    When CTMH came out with the Artbooking Cricut Collection I knew I would need to try stenciling and masking some of the overlay backgrounds from this amazing cartridge! I even played with cutting overlays from acrylic sheets to make a more permanent stencil background! Some of you might remember seeing my hearts stencil at the February Valentine's Day Card Workshop!

    It's hard to try and take a picture of an acrylic stencil, so I thought I would share a video that CTMH made! In this video, Jill makes a mini album using a couple keys from the Artbooking cartridge. However, I want you to pay close attention to the stenciling technique she used to sponge the circles onto her mini album (right around 2:30 in the video)! I think you're going to love this! Check it out:

 
    Isn't that super cute and easy? I love that she used the stencil piece on her project, too! No scraps left behind, people! Notice how she used pigment inks instead of our dye inks, too! This is so that the colors show up "true to shade" on the darker cardstock background! The possibilities are endless with this technique!

    Well I hope you enjoyed this quick Tuesday Tidbit! If you have any questions or would like to order the Artbooking Cricut Collection for yourself, please contact me! I would love to help you start stenciling your projects! Make sure you take some time this week to get creative, and until next time:

Here's to life, love, and creativity!

Tuesday, August 26, 2014

Tuesday Tidbit: Pigment vs Dye Inks

    Good morning, paper lovers! Welcome back to Tuesday Tidbit! Today I wanted to share a video that I think is super helpful when it comes to deciding when to use pigment or dye based inks!

    I think everyone that starts stamping runs across the issue of pigment versus dye inks, and I want to help make it a little clearer for those that have had questions or would like a quick refresher!

    Remember pigment = paint so it's going to be thicker, takes longer to dry (but can be heat set to speed it up), and the color is the "true" shade because the color sits on top of your project.

    In comparison, dye ink = dye! Pretty easy to remember, right? These inks dry fast, will soak into the project to "dye" the image in place, and are water soluble so can be mixed with water to soften the color or create a fun artsy technique! So if you stamp an image in blue dye ink on yellow paper, the image will show up more of a green color when dry!

    Both of these inks are super useful when stamping projects, but knowing the differences can help you determine the "look" of your finished project! Check out the video to see what I mean:


    I hope you enjoyed this helpful video! If you have any questions, though, please do not hesitate to ask! Have a great Tuesday, and until next time:

Here's to life, love, and creativity!