Background

Showing posts with label Mini Albums. Show all posts

Wednesday, November 9, 2016

Get Organized this Fall!

   The election is finally over. I'm not going to get into politics on here because this is not the platform to do so, but I will say that I am glad to not have the ads and phone calls any more this month. So back to the fun things at hand....papercrafting! Woohoo!

   Papercrafting is very therapeutic for me, but so is organizing! I mean who doesn't like to have a new system to store and display your fun supplies???

   Today I want to share with you another shot blog series I am going to do this Fall/Winter called "Get Organized". Today I have a video I did on how I am storing some products that I find difficult to store and/or take with me on crops and retreats. I think you're going to love this! Check it out on my YouTube channel or watch the video below:


   What do you think? Pretty fun, right? I love this Sea Glass Album, and what better way to store these tools than in a pretty album! Let me know your thoughts, and until next time:

Here's to life, love, and creativity!

Wednesday, January 21, 2015

Capture the Love

   Happy Wednesday, everyone!I hope you all are having a great week so far! Today I want to share a project with you all that I made using the new Heartstrings Picture My Life collection and the new Kraft mini album (both from the Seasonal Expressions Idea Book)!

   Some of you may have seen this cute little album during my Preview Party in November/December, but I wanted to show off the details and talk about the embellishments a little bit more today! Plus I wanted to show off the paper-pack-of-the-month, Heartstrings, on a few more of my projects!

   The new Heartstrings Paper Pack goes perfectly with the My Crush "In the Pink" book and accessories! These mini albums are perfect for using up extra Picture My Life cards, too! The possibilities are endless, but I hope you enjoy looking at the project I came up with!

Kraft Mini Album Cover decorated with Slate diagonal ribbon, 2 Heartstrings PML cards, a pink puffy heart from the Chalk it Up Assortment, and a clip and paper flag from the "In the Pink" accessories for the My Crush line.
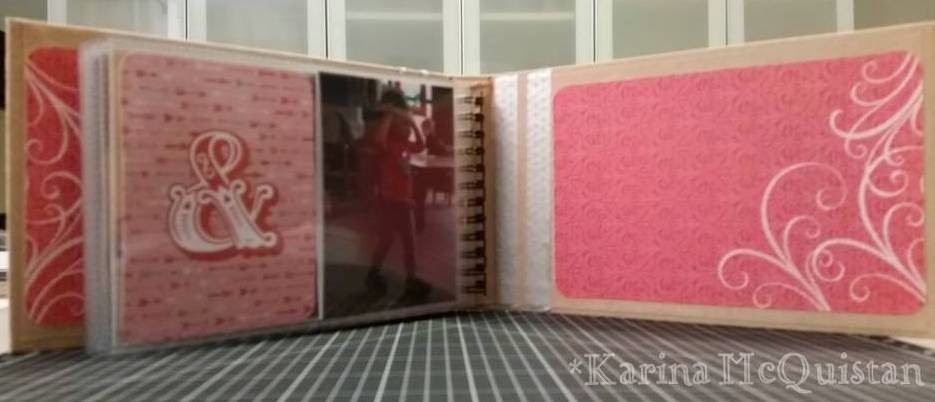
The Inside cover was decorated with Heartstrings paper, an "In the Pink" envelope from the My Crush Assortment pack, stickers from the same assortment, and Pink Flamingo enamel dots.
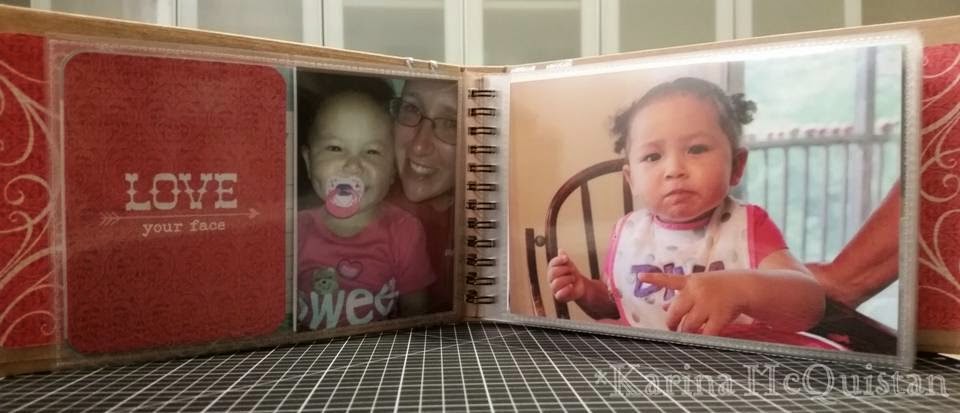
I added Heartstrings PML cards throughout the mini album which has protectors in both 3x4 and 4x6 sizes. Then I added some cute photos of my niece and nephew from this last year!

The 3x4 photos were printed in Studio J and cut apart from the 12x12 sheet! This was an easy and fast way to get all the pictures off my phone and computer, but also get them in a smaller size that does not distort the image.


The back inside cover I decorated with another piece of Heartstrings paper and a couple strips of Slate washi tape. I didn't journal or embellish the cards on the inside of the album, but that's the next step! In total this project took less than an hour to complete!

   This book works well as a brag book in your purse or bag, and also works as a coffee table display album! Either way, you're going to love this little project! Grab your supplies and start getting crafty, friends!

   If you need any of the supplies I used to complete your own Kraft Mini Album, visit my Online Shopping Site today and start shopping!

   Have a wonderful day, friends, and until next time:

Here's to life, love, and creativity!

Monday, December 15, 2014

Day 10: Christmas Card Storage

    Happy Rainy Monday, everyone! I'm excited to share today's 12 Days of a CTMH Christmas with you all! A fellow consultant, Melissa Laverty, posted a really great idea on her blog a couple weeks ago about storing Christmas cards! I loved her idea so much I scraplifted it to share with all of you!

    I love CTMH's 8x8 Kraft Mini Albums! They're perfect for any type of project, and are so much fun to decorate! Today I'm going to show you how to use the Kraft Album to organize all the Christmas cards and photos that you receive this year!

What You'll Need:

1. 8x8 Kraft Album
2. Holiday Happenings Assortment
3. Snowhaven Paper Pack
4. Snowhaven Complements
5. Gold Sequins
6. Sanding Kit
7. Foam Tape
8. Your Christmas Cards

Cover of the Kraft 8x8 Christmas Card Album

    I started by choosing Snowhaven papers that I wanted to use as the base of my album. I chose the Black snowflake pattern and cut it down to 8 5/16" x 8 3/4"! I then sanded the edges of my Snowhaven paper to expose the white core on the sides.

    From here I cut leftover scraps of Snowhaven paper down to add strips of paper on the left side, and added mounted paper behind my sentiment. The "Christmas Cheer" sentiment card can be found in the Holiday Happenings Assortment pack! The large circle embellishment can be found on the Snowhaven Complements pack or, you can do what I did, print extra embellishments on the bottom of your Studio J layouts to cut out and use!

Close up of some Snowhaven embellishments I added to the bottom of my Christmas card Studio J project!

    I popped the sentiment 4"x6" card up with foam tape and added some gold sequins to the cover as well. I still want to decorate the spine with the year and maybe some ribbon, but I haven't gotten to that yet!


    I wanted to cut some "base" cardstock sheets for the inside of my album so that I could mount some of the newsletters and cards that were together (or from one family). I cut Whisper, Glacier, and White Daisy cardstock down to 7 5/8" x 8", and punched holes in them at 1 1/4", 4", and 6 3/4" (and about 3/16" from the edge).

Inside blank pages
    Next I started adding my Christmas cards. Now I'm not an up-to-date scrapbooker. I'm at least 30 years behind (and yes I'm only 31)....so these Christmas cards are actually from 2013! I found them in my "save" stash, though, and started punching holes and inserting them in my album.

   I wanted to make sure my holes lined up on my cards, so I used one of the base sheets to help line up my holes. Then I punched each hole by hand. It sounds tedious, but really it doesn't take long! I was able to get it done in a couple hours!

Open inside front cover and the start of my Christmas cards

View of the side (and I still have room if I wanted to add more)!!
    I staggered the photos, cards, and newsletters throughout the book so that neither top nor bottom was too bulky. For some of the newsletters, I mounted them directly on the base sheets (cutting the newsletters down on the sides if need be).

The newsletter that came with this photo card is mounted on a base sheet behind it. I folded up the bottom so that it wouldn't hang out of the book.
  
    Some of my newsletters, though, were double sided, and I didn't want to glue these down and lose the information. So I came up with a solution. I punched holes in the newsletter with the folded up piece from the bottom in place.

Photos were on the back of this newsletter, so I folded up the bottom and punched holes in it.
  
    However, I still wanted to be able to read the newsletter while it was in the book, so I doctored the bottom flap to flip open.

Newsletter from above flipped open
I was able to flip it because I notched the bottom flap hole to pull apart when needed!
  
    That's it! It was really fun and easy to put together, and it now can be displayed on our bookshelves and compared to this year's Christmas cards!

    I hope you enjoyed this little Christmas project today! I have extra 8x8 Kraft albums on hand if anyone in the area would like to pick one up before the holidays! Otherwise, you can add it to your next order and take advantage of all the December specials going on right now, too!

    Have a great rest of your day, and until next time:

Here's to life, love, and creativity!

Saturday, December 13, 2014

12 Days of Christmas: CTMH Style

   Happy Saturday everyone! Today is officially 12 days before Christmas! So I thought why not celebrate CTMH style! Starting today I will be sharing Christmas crafty projects and some of my favorite CTMH products for this holiday season!

   Today I want to kick off the 12 days of Christmas by sharing my favorite color palette this holiday season! This year I am loving the look of metallics in Christmas home decor and crafty projects.

This is a card I made last year for an embossing workshop I had last December, but I love the look of mixing silver and gold embossing powders and White Daisy ink!

A Christmas card by consultant Vicki Wizniuk that is absolutely breathtaking! She used the gold polka dot washi tape (Z1920), tan glitter paper (Z1830), gold shimmer trim (Z1985), gold sequins (Z2012), and gold embossing powder (Z2066) on this amazing card!
Vicki also made this awesome card using simple embossing and stamping

The new CTMH Holiday Happenings My Crust book (Z2098) has touches of gold throughout the book as well! Plus who doesn't like a vintage holiday look?? I love this book!
A peek at all of the pieces in the Holiday Assortment pack (Z2062)! I spy gold accent pieces! Love love love this whole collection!


   Do you love the look of metallics this holiday season?  What crafty projects have you made this holiday season using metallics? I would love to see what you all have been up to this year! 

   If you can't wait to get your hands on some of these amazing products to make your own metallic decor, shop my Online Shop today to get all of these goodies and more! Happy 12 days of Christmas everyone, and until next time:

Here's to live, love, and creativity!

Tuesday, September 9, 2014

Tuesday Tidbit: Stencil It

    I have another Tuesday Tidbit to share with you! Today I wanted to share one of my favorite techniques: stenciling! I have been stenciling for as long as I can remember. When I was a kid, I had a book about making your own stencils, and I would sit in our family craft room cutting and designing stencils to use on my projects for 4H! It was so much fun!

    When CTMH came out with the Artbooking Cricut Collection I knew I would need to try stenciling and masking some of the overlay backgrounds from this amazing cartridge! I even played with cutting overlays from acrylic sheets to make a more permanent stencil background! Some of you might remember seeing my hearts stencil at the February Valentine's Day Card Workshop!

    It's hard to try and take a picture of an acrylic stencil, so I thought I would share a video that CTMH made! In this video, Jill makes a mini album using a couple keys from the Artbooking cartridge. However, I want you to pay close attention to the stenciling technique she used to sponge the circles onto her mini album (right around 2:30 in the video)! I think you're going to love this! Check it out:

 
    Isn't that super cute and easy? I love that she used the stencil piece on her project, too! No scraps left behind, people! Notice how she used pigment inks instead of our dye inks, too! This is so that the colors show up "true to shade" on the darker cardstock background! The possibilities are endless with this technique!

    Well I hope you enjoyed this quick Tuesday Tidbit! If you have any questions or would like to order the Artbooking Cricut Collection for yourself, please contact me! I would love to help you start stenciling your projects! Make sure you take some time this week to get creative, and until next time:

Here's to life, love, and creativity!

Friday, September 5, 2014

Freakin Weekend Kickoff

    Woohooo! It's Friday! I hope you all are having a great week so far! I having been busy pre-cutting all the cards for next week's Christmas Card Buffet! I still have room if you haven't had a chance to sign up yet! Please just let me know by Sunday, September 7th at the latest!


    This month is all about celebrations!! Have you been following along with CTMH Corporate's Facebook page and/or Instagram account (@ctmhcorp this week? Every day during the month of September CTMH is posting pictures of projects and artwork made using the brand new #30yearsofhappy stamp set! If you have missed it, check out this week's projects:

September 1st project

September 2nd project

September 3rd project

September 4th project

    I love all of these! I definitely am inspired to start playing with this super cute stamp set! Are you ready to get this stamp set for yourself? How about for FREE???

    It's super easy! Purchase $30 worth of retail priced My Acrylix stamps this month, and you automatically qualify for this 30 piece stamp set for FREE!


    Plus don't forget that you can piggyback this special with some of the other Anniversary specials I have going on this month! It's the perfect month to stock up on all those new CTMH goodies you have been scoping out! Start shopping now to take advantage of these amazing deals, and make sure and check out my Steals & Deals page to see all the awesome steals for the month!

    Have a great weekend, everyone, and make sure to get some crafty time in as well! Until next time:

Here's to life, love, and creativity!

Thursday, August 7, 2014

Creative Adventure: Day 5

    Happy Thursday, everyone! I am dragging today! I think all this running around the last two months has me worn out! Plus my bed was feeling a little extra cozy this morning, and made it impossible to want to get up! Here I am, though, with another installment of my Creative Adventures this summer!

    Today I wanted to show off some Candid Crafters Team Members! These ladies are amazing women who have become good friends over the years, and also happen to be very talented paper crafters! So today I wanted to show off their artwork as well as some snapshots from a couple of our recent get togethers!

    First up are my good friends Shannon and Sophie! They joined my team in April because they loved all of the CTMH products and wanted to get discounts on their favorite items! Plus the Consultant Promotion we had in April was an amazing deal!

    I met Shannon through my husband, Ian. He worked with her husband, and found out that both of their wives loved scrapbooking. So they introduced us, and we became good friends!

    I met Sophie through Shannon (triangle after triangle)! Sophie was Shannon's daycare provider when her kiddos were younger, and they started hanging out and scrapbooking together for a girls' getaway! So when I met Shannon they invited me along to their crafty getaways, and we all became friends after that!

    I don't have any of these ladies' artwork to share today, but I have pictures from my last couple crop events where these two attended and stayed all day to play!

Croptoberfest: October 2013

Scrap Your Stash Event: April 2014
 
    The next team member is Jessica from Waukee, IA! I met Jessica when we both worked at Famous Dave's in Des Moines. She and I became friends pretty quickly, and then started getting together to scrapbook at my house every now and then! Jessica had a CTMH gathering at her house last year, and it went over so well that we decided to start a monthly club where I come down and do a project with the girls, and they get to see all the products and have a girl's night! It's been a ton of fun, and everyone looks forward to our workshops every other month!

    Jessica became a member of my team in April as well because she has fallin' in love with CTMH as much as I have! She has been working on a couple projects for other teachers in her school, and started using CTMH products to finish their albums and mini books! Here are a couple pictures of the most recent mini album Jessica made for a fellow teacher:

The front cover of the Baby Mini Album

The front side of the accordion mini album

The back side of the accordion mini album showing both covers

     Didn't she do an awesome job? I just love how cute it is! I'm sure the teacher she made it for was excited to receive it as a gift!

    Another member of my team is Ellie! Ellie lives right here in Hastings, MN, and signed up as a member in April, too! We met because a coworker and friend of Ellie's found my CTMH site online and asked if I could come do an album demonstration for a group of girls looking for new albums. That group of girls and I became good friends after that, and did some scrapping together a few times!

    Ellie use to be a Creative Memories Consultant, and decided to join the CTMH team in April with the great promotion and an anxious group of friends that were hoping for some "Ellie Workshops"! So she hit the floor running and has done awesome making her hobby into a little business! She is super talented, and I love seeing what she's creating week-to-week! Here are a few glimpses at some recent artwork by Ellie:

Upcoming Layout for a workshop she is doing
Cute little tag using the August SOTM: What a Hoot!
Timberline layout she did as a workshop a couple months ago
Beautiful card she taught at a card workshop she had a couple months ago!

    Isn't she inspiring?? I love watching her post artwork! She's been so fun to have on my team, and to meet up with around town for ideas and to share experiences!

    The last couple girls I do not have recent pictures of, but I can still tell you about them! Kim is my CTMH upline (meaning I signed up under her when I started)! She is also my cousin! Kim introduced me to CTMH a little over 3 years ago, and I haven't looked back since! I had the pleasure of having Kim in my wedding, and I get to return the favor this fall for her's! Remember my Timberline layout from May with pictures of a cute little guy? That's Kim's son, Landon! Here's a refresher:


    Isn't he a doll? He's gotten a lot more mobile these days, and I cannot wait to visit with them again when I'm down in southern WI!

    The other team member is Katie! Katie is a good friend of Ellie's, and they use to work together in Hastings. Katie moved to the St. Cloud area a couple years back, though, but every once in a while will come down to have a girl's crafty weekend with everyone! I met her at the last couple get togethers with Ellie and the girls, and her and I hit it off right away!

    Katie also signed up in April and has been loving CTMH since being introduced in January! I am looking forward to visiting with her again soon and seeing what she's been up to in the northern part of the state! :)

    So that's the team! It's a great group of girls, and we have a TON of fun when we get together for meetings, crafty weekends, and just girls nights! We had a couple team meetings together at the beginning of July, but of course I forgot to snap some pictures of our meetings! Yep me....the photo paparazzo.... forgot to take photos! Go figure, but I will definitely be taking some at the next couple get togethers!

    Looking for a good excuse to join us for girl's night and crafty weekends? You can be a member of my team, too! Plus who doesn't like their favorite products for a discount? You can find lots of information under my "Joining" tab above, or you can contact me anytime! We would love to have you join us as a friend and fellow crafter!

    Hope you enjoyed meeting the team! Stay tuned tomorrow for another edition of my summer Creative Adventures, and until next time:

Here's to life, love, and creativity!

Wednesday, August 6, 2014

Creative Adventure: Day 4

    Today I bring you the final installment of CTMH Convention 2014 pictures! For Part 3, I will be sharing photos from the Consultant showcase (amazing talent there), and the Product Extravaganza (holy moly are these ladies crafty.....totally want to be one of them someday!!!). Hope you enjoy re-living Convention with me!

Consultant Showcase:


    Consultant could sign up to bring projects of theirs to display and share with everyone else at Convention. CTMH set up 1/2 of a Conference hall with tables around the perimeter of the room, and then we were able to walk around the room, take pictures, ask questions, and drool over all the amazing ideas! Any consultant that participated received a free stamp set from the new Idea Book! Here are just a few of the pictures I took from that evening:


Product Showcase/Extravaganza:


    Extravaganza at Convention is one of the most highly anticipated events the whole weekend! A few chosen Consultants are asked to demonstrate and talk about new product and then show off their creations with those products! These ladies are so freakin' talented I can't even tell you! See for yourself what I mean:

    First up is the very talented and very inspiring, Michelle Synder with "Party Planning" and home decor ideas:


    Love her ideas! I wanted to sit in her room all day and look at all the pretty decor pieces! I definitely am going to have to scrap lift some of these in the near future!

    Next up is the very talented  Gina Candelaria with more Home Decor ideas!


    I love what she did with the Picture My Life cards and the large picture frame! Soooo stinkin' cute! Might have to try something like that for my office!

    My next stop was to the amazing (and a personal favorite), Melissa Laverty with "My Crush" book ideas!


    I love what Melissa did with all her projects! She's so crafty! One piece of advice she gave was to think of the "My Crush" albums as an entire paper pack. It's genius! Why not, right? You get 30 pages of double sided paper that all coordinates for less than $13! It's a steal! I can't wait to show off some of my projects using "My Crush" papers!

    Next up is the extremely talented and super creative, Jamie Turner who showed off "Base & Bling"!


    So much fun! This had me waiting to get out my extra Base & Bling items and start playing with them on my layouts and cards! Thanks, Jamie, for all the great projects!

    The next room was demonstrating Picture My Life scrapbooking kits in new ways with the one and only Sheri Rottler!


    The last room was closed up before I could take pictures of any of the amazing and beautiful projects by Bren Yule! Bren was showing off projects with the new Artfully Sent Cricut Collection! She had the cutest things displayed, and told funny stories about trying to use the cartridge without a handbook! She was awesome! So I'm sorry I didn't get a chance to get photos. The room was locked up by the time I was getting my pictures taken, and my camera battery was finally starting to die! Soo I went to lunch and charged the battery for an hour!

    I hope you all enjoyed all the amazing pictures of the artwork these consultants shared with us! It was so inspiring to see all the different ways our awesome products could be used! It made me want it all that much more than I already did! So well done presenters!

    If you loved looking at all my Convention pictures and would like to attend with me next year, you still have a chance! Convention 2015 is back at Disneyland in Anaheim, CA from July 9-11th! It's so much fun, and you get more free product and creative projects than you could possibly image! The cost is only $300 to attend, and room rates are already locked! So there's plenty of time to save pennies and plan costs! Plus if we go together we can split the room cost as well! It really was the best vacation, and I started planning for next year as soon as I got home! :) If you want to know more, contact me today, and I would love to help you get to California with me next year!

   Stay tuned tomorrow for Day 5 of my Creative Adventure this summer! Oh yes...I still have more events and projects to show off for you all! Until next time:

Here's to life, love, and creativity!