Background

Monday, December 22, 2014

Day 3: Wrapping Paper Solutions

    Sorry I didn't get a chance to keep up on my posts these last few days, friends. It has been a run-around, crazy mess in the McQuistan household. Ian was working nights this last week, and it has been a really tough week. He barely had any sleep, was called in to work in the middle of the night a few times, had super sick patients, and was helping battle the atrocious Flu season we have entered.

    I have been up a lot more this week, too, with his night calls. So I have been tired and groggy all this week as well (but not quite in the same way that Ian is I'm sure!!).  I also had a dentist appointment and needed to get some packages together so I could mail them out before the weekend. I needed to take some time to pick up and clean our house a little bit (it was starting to look like a tornado in here). So yeah....I put off the blogging and crafting, and worked on family stuff for awhile.

   We also went to Iowa this last weekend to visit friends and family before Christmas and to attend a family party. This week we need to finish up some last minute shopping, wrapping, and other little things before we head to Wisconsin for my family Christmas. So it's definitely crazy busy!

    So today I'm actually showing you Day 3 of our 12 days of a CTMH Christmas. It's funny because I was going to do this whole feature on creating your own wrapping paper and personalized gift bags, and then last week CTMH posted a similar idea on their blog! So I'm going to feature the same thing today!

    I love the look of personalized gift decor! It's so much fun to make and decorate, and it helps me use up my stash! Plus it really doesn't take long to make, and gives me a reason to get crafty!

A fellow consultant had these CTMH Burlap bags on her blog. They were decorated using the Christmas mini stamps, twine, mini clothespins, and the retired Sparkle & Shine fabric set! I love how cute these little bags are!
Decorate some of CTMH's burlap bags with ribbon, a tag, and some embellishments! These bags are perfect in stockings, for teacher gifts, and for those odd shaped small items that you want to stash away on Christmas Day!
Here are a couple examples of paper gift bags I bought from the Dollar Store and decorated with simple Cricut cuts and embellishments! I love how these turned out, and they were so simple to put together!
Fellow consultant, Joy Tracey, made this gorgeous gift bag using Cricut cuts and glitter paper!
Joy Tracey also made this gift bag! See how awesome it looks with just a couple simple cuts? I love these ideas!

    I also love using Christmas scrapbook paper to make envelopes for my Christmas cards. It's a great way to use up my stash, and to personalize my cards just a little bit more! This is how I do it:

1.) I measure my card that I need an envelop for. This one is almost 5"x7". I then use WRMK Envelope Punch Board to figure out how much paper I need and at what size.
2.) According to the Punch Board, I needed a piece of paper 9 1/2" x 9 1/2". I use pattern paper that is printed on one side and white on the other.
3.) I flip the pattern paper over and score the white side of the paper according to the board instructions.
4.) This is what the scored piece looks like notched and scored.
5.) I then round the corners of my scored piece. There is a corner rounder on the punch board, but mine needs some oil and sharpening. So I chose to use my CTMH rounder which allows me to punch through a couple sheets at a time.
6.) I fold the paper along the scored lines with the pattern on the inside of the envelope.
7.) Last, I run a couple lines of permanent adhesive on either side of the inside flaps, and glue my envelope together. Now I have a fun Christmas envelope to match my homemade Christmas cards! It's super easy to do and doesn't take much time at all! I love it!

    The possibilities are endless! Plus it's a great way to get creative during the hustle and bustle this holiday season! Check out more ideas on personalizing gift packaging and how to make some fun Cricut packages on CTMH's blog today! I hope this has inspired you to get crafty this weekend! Until next time:

Here's to life, love, and creativity!

Friday, December 19, 2014

Day 6: Hot Chocolate Bar

    On the 6th day before Christmas CTMH gave to me an amazing idea from fellow consultant Michelle Synder! Today's crafty project comes to you from Michelle's display at Convention this past summer! She had such an amazing presentation that I felt inspired to make it a Crafty Christmas! I want to re-create this amazing display using the Magnetic Chalkboard Frame at my family get together! Without further ado, I want to share with you Michelle's Hot Chocolate Bar!

What You'll Need:

1. Cupcake Boxes
2. Magnetic Chalkboard Frame or Home Decor Frame of your choice
3. Snowhaven Complements
4. Cardstock: Cranberry, Whisper, White Daisy, Black, Kraft,
5.Slate Diagonal Ribbon
6. Whimsy Fundamentals Paper Pack (Glacier pieces)
7. Handwritten Print Alphabet stamp & White Embossing Powder
8. Cricut Collections: Artiste


Michelle used Cricut cut snowflakes and the Snowhaven Complements to accent her Home Decor Frame! You might be wondering how she received a red frame! Well simple...she spray painted it! The chicken wire pops off the back fairly easy, and then you can spray paint the frame whatever color you would like! Michelle then cut out a banner spelling out her title, backed it with cardstock, and added Slate Diagonal ribbon for detail!
For her "Hot Chocolate Bar" she used the CTMH cupcake boxes to store her goodies! One box holds the packs of cocoa, one holds bags of marshmallows, and the other holds candy cane sticks! She decorated each box with cardstock and snowflake diecuts, and added a touch of the Glacier Paper Fundamentals and some Slate Diagonal Ribbon for an added touch! I love Michelle's ideas, and think this one was super cute!
 
    Doesn't Michelle do an amazing job? I hope that her work has inspired you as much as it inspired me this holiday season! If you have any questions about Michelle's display or would like to know more about the products used, let me know! I would love to help you find everything you need to re-create this special display! Have a wonderful Friday, friends, and until next time:

Here's to life, love, and creativity!

Wednesday, December 17, 2014

Day 8: Bling-a-ling

    Good Afternoon, everyone! I hope you all are having a great week so far! I have had a busy morning running around the cities! I helped a friend get to his appointment this morning, and then headed to Target and Walmart to do some last minute shopping for a family that we "adopted" for the holidays!

   Now I just have to get all my stuff together to drop off, plan dinner, and clean this dirty house! Yep....always a crazy house!

    There are only 8 days left until Christmas, though, and today I want to talk about one of my absolute favorite things to use on all my projects: BLING!!!

    Christmas is the perfect time for using bling, and I think CTMH has some of the best bling pieces out there! There are 5 CTMH bling embellishments I cannot live without:

5. Bling Gems Gold Assortment


    I love this pack of gems! There are two shades of gold bling gems included in each pack, and they are very shiny and glittery! Plus they are adhesive backed and ready to use immediately! I have used these a lot on Christmas cards and projects!

Bling Gems Gold Assortment (Z2023)

4. Sparkle Flourishes


    If you haven't used these yet, you definitely need to get your hands on some! These adhesive backed flourishes come in large or small assortment, and in either clear or black gems! They are amazing on layouts and projects, and worked perfectly with my Snowhaven projects this month!

Black Sparkle Flourishes (Large sizes...Z1745)
Clear Sparkle Flourishes (Large sizes...Z1708)

3. Sparkle Gems


    I love CTMH's sparkle gems! You get 108 in a pack and they're less than $3 a pack! Plus you get a choice of color: clear, brown & tan, or black & grey! I love them all! Plus they're also adhesive backed making them really easy to place on your projects in no time!


2. Shimmer Trim


    Who doesn't love glitter tape?? CTMH has 10 different colors of shimmer trim available now, and I love every single one! The clear backing can be a little tricky to peel off, but I use my micro-tip scissors to help me get started! I even plan on using some of my shimmer trim on gift wrapping this year! For less than $5 a spool, it's totally worth the awesome look on my gifts!

Gold, Pink, Red, Teal, Purple, Silver, Black, and Bronze Shimmer Trim
Brand NEW White and Blue Shimmer Trim

1. Sequins


    Last, but certainly not least, is my number one bling of the Christmas season: CTMH Sequins! I love love love our sequins. I ran out of silver sequins before my craft fair expo in November, so I ran to the store to find an alternative. I found a bottle of silver and black sequins, but they were very flimsy, chipped easily, and were hard to glue down.

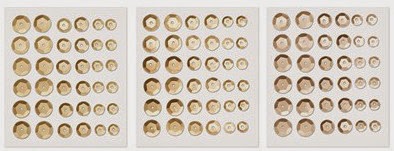
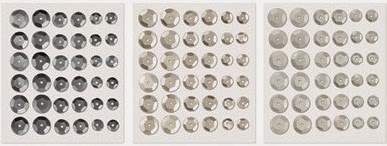
    I was so glad to get my order from CTMH with more silver sequins in it! You get 3 sheets in each pack, and each sheet is a different shade of the main color  (Gold or Silver). Plus you get 3 different sizes per sheet! They are so nice!

   Plus these, like all of CTMH's bling line, is adhesive backed and super easy to place on projects! If you haven't jazzed up your projects with sequins, yet, then you need to add this to your wish list! You won't be sorry, I promise!

Gold Sequins
Silver Sequins

    I hope you get a chance to play with some bling this week! I definitely am looking forward to it these next couple days! Enjoy your evening, friends, and I'll see you back here tomorrow! Until next time:

Here's to life, love, and creativity!

Tuesday, December 16, 2014

Tuesday Tidbit: ShinHan Marker Madness

   Happy Tuesday, everyone! I hope you all are doing well and enjoying your week so far. Have you been Christmas shopping, decorating, baking, and preparing for the holiday season? Today is 9 days before Christmas, and I have a special Tuesday Tidbit and favorite product to share with you today!

   You all know how much I love our new ShinHan Touch Twin Alcohol markers, but did you know all the wonderful things you can color with them??

   One of my favorite tricks is using the markers to color embellishments to match my project! You can color buttons, metal embellishments, ribbons, wood veneer, gems, sequins, and so much more! The ink from the alcohol marker dries quickly, and the color stays vibrant and saturated, too!

Clear buttons colored with ShinHan markers
White Enamel Stars colored with ShinHan markers
Clear Sparkle gems colored with a ShinHan marker
Twill ribbon colored with a ShinHan marker
Silver Sequins colored with a ShinHan marker
New White Shimmer Trim colored with a ShinHan marker
Lagoon Heart Washi Tape colored with a ShinHan marker

   I hope you enjoyed this helpful tip in getting the most out of your ShinHan Touch Twin markers! If you want to see more and learn some basic coloring techniques, make sure and sign up for my ShinHan coloring class in January! Have fun playing with this technique, and make time to get crafty this week! Until next time:

Here's to life, love, and creativity!

Monday, December 15, 2014

Day 10: Christmas Card Storage

    Happy Rainy Monday, everyone! I'm excited to share today's 12 Days of a CTMH Christmas with you all! A fellow consultant, Melissa Laverty, posted a really great idea on her blog a couple weeks ago about storing Christmas cards! I loved her idea so much I scraplifted it to share with all of you!

    I love CTMH's 8x8 Kraft Mini Albums! They're perfect for any type of project, and are so much fun to decorate! Today I'm going to show you how to use the Kraft Album to organize all the Christmas cards and photos that you receive this year!

What You'll Need:

1. 8x8 Kraft Album
2. Holiday Happenings Assortment
3. Snowhaven Paper Pack
4. Snowhaven Complements
5. Gold Sequins
6. Sanding Kit
7. Foam Tape
8. Your Christmas Cards

Cover of the Kraft 8x8 Christmas Card Album

    I started by choosing Snowhaven papers that I wanted to use as the base of my album. I chose the Black snowflake pattern and cut it down to 8 5/16" x 8 3/4"! I then sanded the edges of my Snowhaven paper to expose the white core on the sides.

    From here I cut leftover scraps of Snowhaven paper down to add strips of paper on the left side, and added mounted paper behind my sentiment. The "Christmas Cheer" sentiment card can be found in the Holiday Happenings Assortment pack! The large circle embellishment can be found on the Snowhaven Complements pack or, you can do what I did, print extra embellishments on the bottom of your Studio J layouts to cut out and use!

Close up of some Snowhaven embellishments I added to the bottom of my Christmas card Studio J project!

    I popped the sentiment 4"x6" card up with foam tape and added some gold sequins to the cover as well. I still want to decorate the spine with the year and maybe some ribbon, but I haven't gotten to that yet!


    I wanted to cut some "base" cardstock sheets for the inside of my album so that I could mount some of the newsletters and cards that were together (or from one family). I cut Whisper, Glacier, and White Daisy cardstock down to 7 5/8" x 8", and punched holes in them at 1 1/4", 4", and 6 3/4" (and about 3/16" from the edge).

Inside blank pages
    Next I started adding my Christmas cards. Now I'm not an up-to-date scrapbooker. I'm at least 30 years behind (and yes I'm only 31)....so these Christmas cards are actually from 2013! I found them in my "save" stash, though, and started punching holes and inserting them in my album.

   I wanted to make sure my holes lined up on my cards, so I used one of the base sheets to help line up my holes. Then I punched each hole by hand. It sounds tedious, but really it doesn't take long! I was able to get it done in a couple hours!

Open inside front cover and the start of my Christmas cards

View of the side (and I still have room if I wanted to add more)!!
    I staggered the photos, cards, and newsletters throughout the book so that neither top nor bottom was too bulky. For some of the newsletters, I mounted them directly on the base sheets (cutting the newsletters down on the sides if need be).

The newsletter that came with this photo card is mounted on a base sheet behind it. I folded up the bottom so that it wouldn't hang out of the book.
  
    Some of my newsletters, though, were double sided, and I didn't want to glue these down and lose the information. So I came up with a solution. I punched holes in the newsletter with the folded up piece from the bottom in place.

Photos were on the back of this newsletter, so I folded up the bottom and punched holes in it.
  
    However, I still wanted to be able to read the newsletter while it was in the book, so I doctored the bottom flap to flip open.

Newsletter from above flipped open
I was able to flip it because I notched the bottom flap hole to pull apart when needed!
  
    That's it! It was really fun and easy to put together, and it now can be displayed on our bookshelves and compared to this year's Christmas cards!

    I hope you enjoyed this little Christmas project today! I have extra 8x8 Kraft albums on hand if anyone in the area would like to pick one up before the holidays! Otherwise, you can add it to your next order and take advantage of all the December specials going on right now, too!

    Have a great rest of your day, and until next time:

Here's to life, love, and creativity!

Sunday, December 14, 2014

Day 11: Crafty Storage

     Hello friends! How has your weekend been going? I have been enjoying this unseasonably warm weather this weekend! I can't believe there's only 11 days left until Christmas and Minnesota is suppose to get up to 48 degrees today! That's crazy! I have a feeling we won't be having a white Christmas this year!

    This weekend I have been busy prepping my home for Christmas: we decorated some more, made sugar cookie dough, and did some Christmas shopping! I also am eagerly awaiting the arrival of my early Christmas presents!!! That's right I am receiving the new CTMH Rolling Tote and Shoulder Bag for Christmas this year, and I can't wait to see them in person!

    I love organizing, but I hate packing. I know it seems counter-intuitive, but it's true! When I have to pack for a trip (especially one where I have to pack my crafting supplies), I procrastinate the packing portion to the last minute! I always have a hard time finding the right way to pack my supplies! Well not any more! I think the new Rolling Tote and matching Shoulder Bag are going to make packing my crafty stuff so much easier!

Notice all the storage pockets and extra details! You can store you trimmers, scoreboard, Idea Books, and more in the side pockets. You can store 12x12 items in the front pocket, and, my personal favorite, the middle section holds all the CTMH organizers! Love love love this!

Rolling Tote: (outside dimensions, including the wheels and feet) 25" × 16 " × 17" with an expandable handle that extends 16¼" above the top of the bag.

Shoulder Tote: 17" × 15" × 3", not including the handles. The handles have a 10½" drop.
  
    I love that these products are made from durable materials, too! Each one is made of a durable canvas fabric with strong faux leather support (as seen on the bottom of the shoulder bag). Plus the materials used are trendy and fashionable, too! They're just a must have this year!

   If you would like a close-up view and demonstration of these amazing new organizational products, check out the video that CTMH released just this last week! You're going to fall in love:


     Did you know you can get the rolling tote for 50% off?? Yep it's super easy, too! Gather a couple of your best crafty friends and host a CTMH gathering! Once your gathering sales reach $250 or more, you qualify for 1 item of your choice for 50% off (and the Rolling Tote totally qualifies)!! Isn't that awesome??? 

    Quantities are limited at the moment as demand is very high! I will keep you posted when the totes are back in stock, though! I anticipate that there will be a few more available each week of December, but keep checking back for full details as the month progresses! 

    I hope you're enjoying my 12 days of CTMH Christmas! If you have any questions or need more information, feel free to contact me! I would love to help you out! Enjoy the rest of your Sunday, and until next time:

Here's to life, love, and creativity!

Saturday, December 13, 2014

12 Days of Christmas: CTMH Style

   Happy Saturday everyone! Today is officially 12 days before Christmas! So I thought why not celebrate CTMH style! Starting today I will be sharing Christmas crafty projects and some of my favorite CTMH products for this holiday season!

   Today I want to kick off the 12 days of Christmas by sharing my favorite color palette this holiday season! This year I am loving the look of metallics in Christmas home decor and crafty projects.

This is a card I made last year for an embossing workshop I had last December, but I love the look of mixing silver and gold embossing powders and White Daisy ink!

A Christmas card by consultant Vicki Wizniuk that is absolutely breathtaking! She used the gold polka dot washi tape (Z1920), tan glitter paper (Z1830), gold shimmer trim (Z1985), gold sequins (Z2012), and gold embossing powder (Z2066) on this amazing card!
Vicki also made this awesome card using simple embossing and stamping

The new CTMH Holiday Happenings My Crust book (Z2098) has touches of gold throughout the book as well! Plus who doesn't like a vintage holiday look?? I love this book!
A peek at all of the pieces in the Holiday Assortment pack (Z2062)! I spy gold accent pieces! Love love love this whole collection!


   Do you love the look of metallics this holiday season?  What crafty projects have you made this holiday season using metallics? I would love to see what you all have been up to this year! 

   If you can't wait to get your hands on some of these amazing products to make your own metallic decor, shop my Online Shop today to get all of these goodies and more! Happy 12 days of Christmas everyone, and until next time:

Here's to live, love, and creativity!

Friday, December 12, 2014

Christmas Time

    It's been awhile since I posted on the blog, and I apologize for that! I have been home, but busy decorating the house, entertaining family, and enjoying my favorite time of year!

    Christmas is so many things for me, but I think my absolute favorite part of Christmas is the giving! I love giving (and most of you that know me already know that)! I love shopping for other people, the surprise of finding the perfect gift that they didn't ask for, and the random acts of kindness that continue all season long!

    It's a season so full of hope and love, and, for me, is very inspiring! I hope you all get to feel this same way this year, and I hope that the feeling carries through in 2015!


    This is a short post today, but I just wanted to share some special thoughts on this December morning! Have a wonderful Friday, everyone, and until next time:

Here's to life, love, and creativity!

Tuesday, December 2, 2014

Tuesday Tidbit: Flip Flaps

   Good Morning, everyone! I hope you're all staying warm on this chilly Tuesday! Today I wanted to bring a classic product back in the spotlight for the Tuesday Tidbit!

   Today I want to talk more about Flip Flaps! If you have not seen these or used these yet, you're in for a treat! These amazing memory protectors are perfect for expanding your layouts, adding more pictures to your pages, adding ephemera and memorabilia to your projects, and so much more!

   Here is a quick video that CTMH made about using Flip Flaps:


   Another amazing consultant from CTMH made an awesome video about using Flip Flaps on her layouts! Lynn Como is the Flip Flap master, and I love how her projects turn out with these awesome added details:


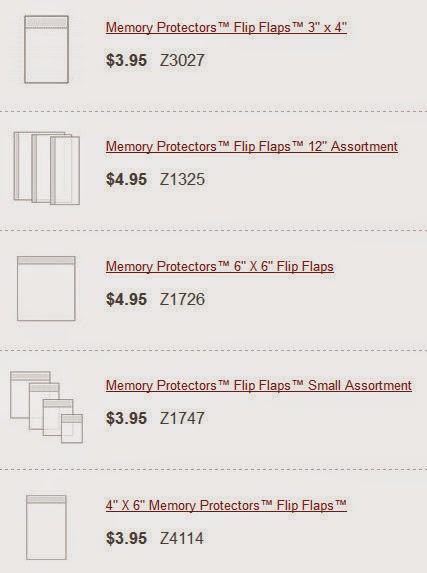
   Aren't these the most amazing products ever??? I love them! Flip Flaps come in a variety of sizes and packs, and you're going to want all of them! You can get a small assortment, 3x4 pack, 4x6 pack, 6x6 pack, and large assortment! Plus they are super reasonable: each pack is anywhere from $3.95-$4.95 each!


   Some of you have seen flip flaps on my projects, but just in case you haven't......here are a couple examples of flip flaps in a My Crush book I made about our 2011 summer travels:
4x6 Flip Flaps connected together to make an accordion of photos on my page!
The back side of the accordion Flip Flaps! I was able to fit 9 pictures on this one page! Woohoo!

   Are you ready to try Flip Flaps?? You can get yours today on my Online Shop! Otherwise, if you'll be at one of my upcoming workshops, I have a bunch of Flip Flaps in my Cash-n-Carry stash that you can get in your hands right away! Just let me know, and I'll set some aside for you!

   I hope you all enjoyed this Tuesday Tidbit! Have a wonderful rest of your day, and until next time:

Here's to life, love, and creativity!

Monday, December 1, 2014

December Deals

   Welcome to Cyber Monday, and the first day of December! Can you believe we have entered the last month of 2014?? Yeah....me either!

   However, December is a great month to be a Close to My Heart fan! In fact, December is being kicked off with some of the best deals that CTMH has ever offered! So without further ado....I would like to present December's steals and deals for you!

Cyber Monday Deal


   You do not want to miss today's Cyber Monday deal! Today only you can get 20% off any CTMH Cricut Collection of your choice! That's only $79.20 for any collection!

   Each collection comes with 3 D-sized, coordinating stamp sets and a project starter kit (like Dimensional Elements or a pack of White Daisy cardstock...it all depends on the collection you choose)! These collections retail for $125, but you can get any of them for only $79.20! It's so awesome!


   So make sure and log on to my Online Shopping site today to get your Cyber Monday crafting shopping done today! Plus.....with this purchase you can take advantage of even more December specials.....keep reading for more details!

Deal of the Decade


   December marks the 10 year anniversary of CTMH's My Acrylix clear, polymer stamp sets! To celebrate, CTMH is offering a very special offer all month long!

   During the month of December, when you place a qualifying order of $50 or more you get to choose any C or D-sized stamp set from the Annual Inspirations Idea Book for only $10!!!


   To make this deal even sweeter, there is NO LIMIT on the amount of stamp sets you can get for $10 each!! That's right.....once you reach that $50 order total...you can get as many C and D-sized stamp sets as you want for only $10 each!

   The only exception is that none of the C and D-sized stamp sets from the Seasonal Expressions supplement Idea Book qualify for the $10 special. However, you can purchase items from the SE Idea Book to help you get to the $50 order total!

   So if you place an order today, Cyber Monday, to get a Cricut collection for 20% off, you also can get C and D-sized stamp sets from the Annual Inspirations book for $10 each! It's just a full day of awesome savings, but wait....there's even more!

December Stamp-of-the-Month: Cutie Pie


   This month's SOTM is a super cute set of 11 fun images that are perfect for any occasion! Plus they are perfect for coloring and shading with our new ShinHan Touch Twin Alcohol markers! Check out the entire set below:


   This month you can get this entire stamp set for only $5 with any $50 purchase! This means that if you take advantage of the Cricut sale today, you can also get this stamp set for $5 and other C and D-sized stamp sets for only $10 each! It's going to be a crafty Christmas, friends, and lots of savings are to be had today!

Seasonal Expressions I


   December 1st is also the day that the Seasonal Expressions supplemental Idea Book goes live to the public! If you have not seen it already, you are going to love this awesome little Idea Book!

   It's packed with 40 pages of all new CMTH products including new collections, embellishments, Picture My Life collections, and so much more! It's amazing!

   You can view this new Idea Book online starting today or you can get your own copy from me at any time! Just let me know, and I can get a book out to you!


   Keep in mind that some of the products in the Seasonal Expressions Idea Book are only good until March 2015. When you look through the book, look for the clock icon next to the product name. This clock means that it's only available for a limited time, so you definitely want to stock up on your favorites!


   I hope that this has gotten you all into the Holiday shopping mood! If you have any questions, or need help placing your Cyber Monday order, please let me know! Otherwise, have a great December 1st, and until next time:

Here's to life, love, and creativity!